


There are no products in the cart
Color
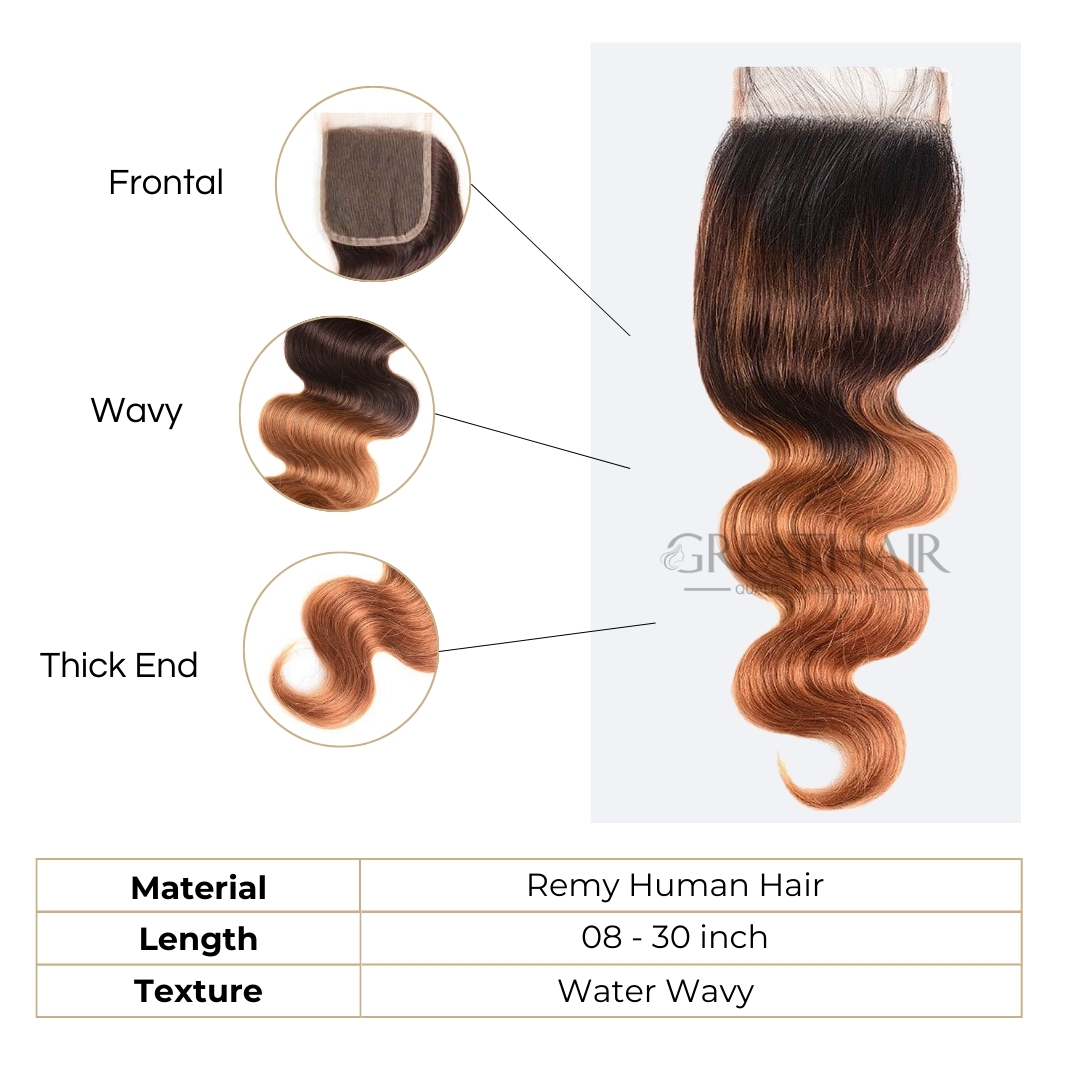
Texture
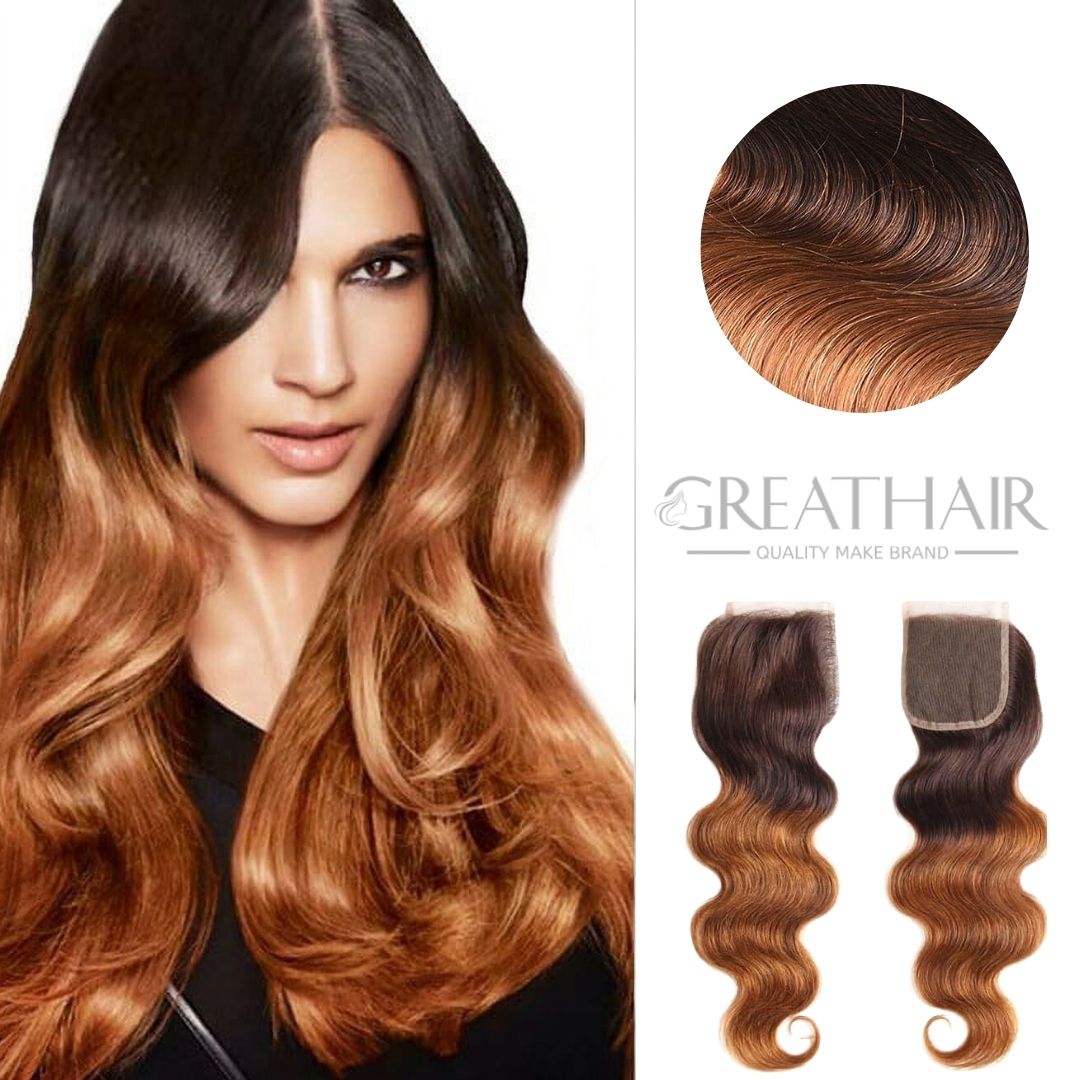
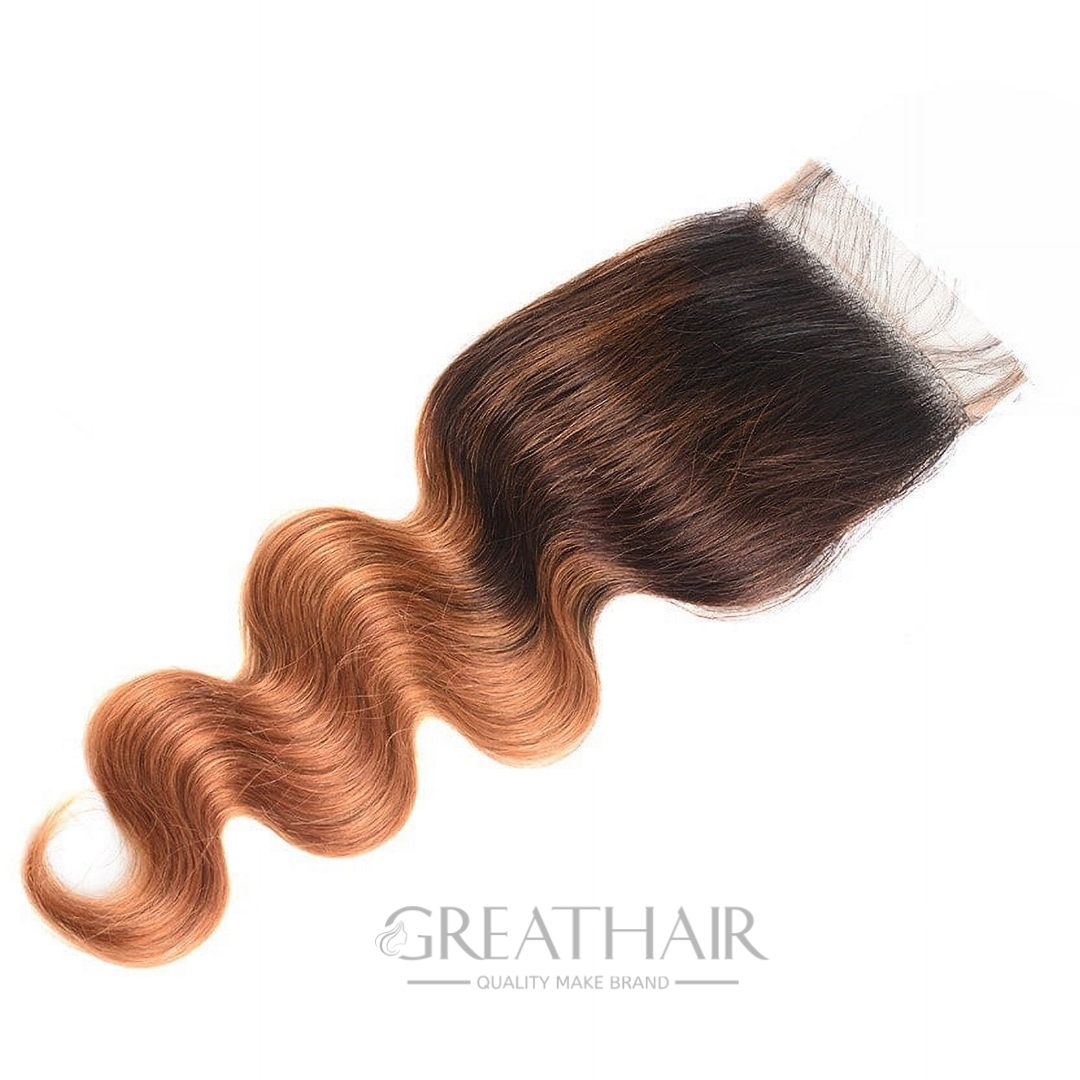
Choosing an ombre brown orange color water wavy frontal offers several benefits that make it both practical and stylish.
First, the water wave texture helps add volume and body. Unlike straight hair, the wave pattern naturally creates fullness, making the hair appear thicker and more lively. This is especially helpful for people who want a fuller hairstyle without adding too many bundles.
Second, the ombre color design creates a natural gradient effect. Instead of a single flat color, the brown-to-orange transition adds dimension. This helps the hair catch light beautifully and creates a more dynamic appearance.
Another benefit is styling versatility. The water wavy texture can be worn in its natural form for a soft, beachy look, or it can be styled with curling irons or straighteners for different finishes. Whether someone prefers loose waves, defined curls, or a smoother style, the frontal provides flexibility.
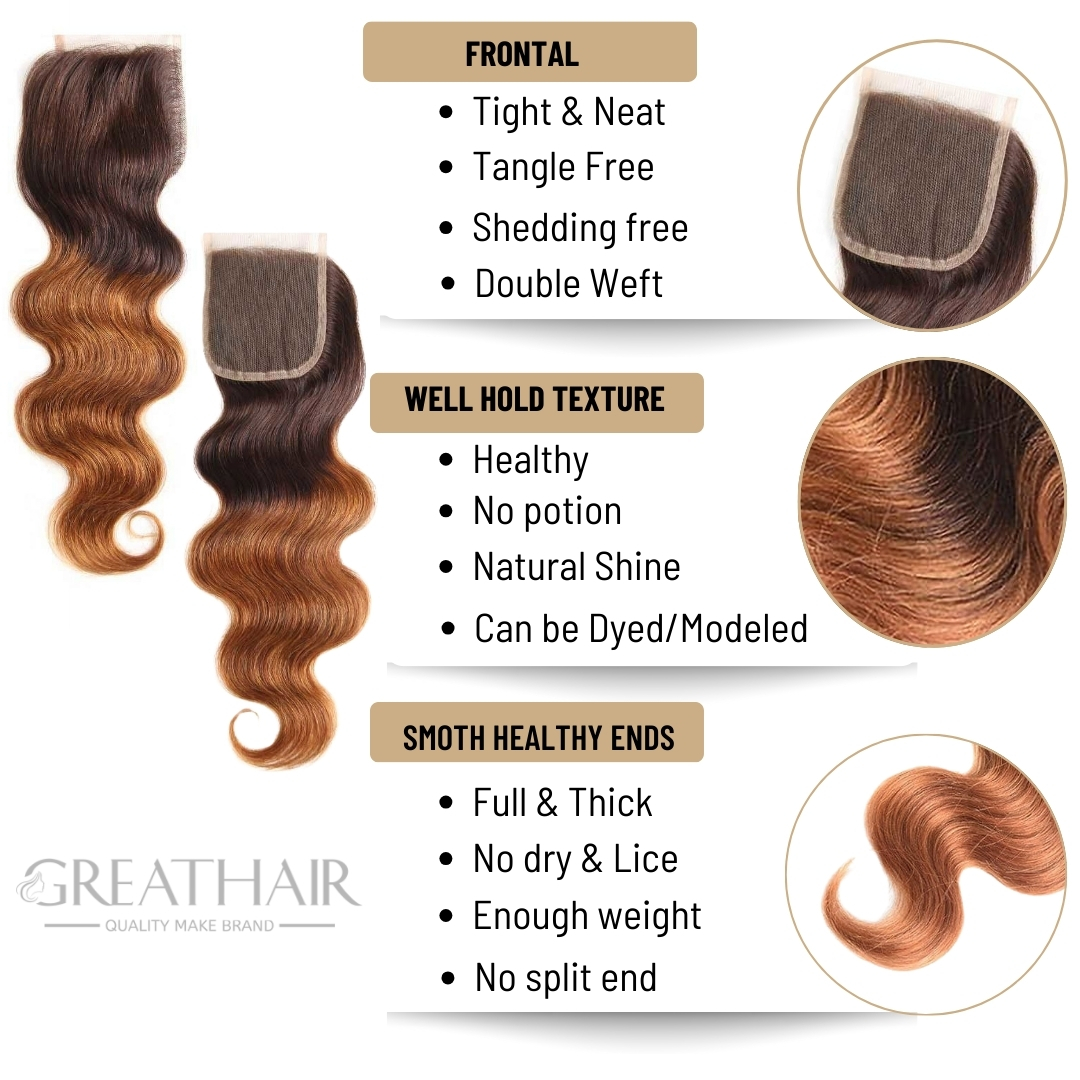
The frontal construction also helps achieve a realistic hairline. This is important for people who want their hairstyle to look natural when worn as part of a wig or sew-in installation. It allows for more styling freedom around the forehead and parting area.
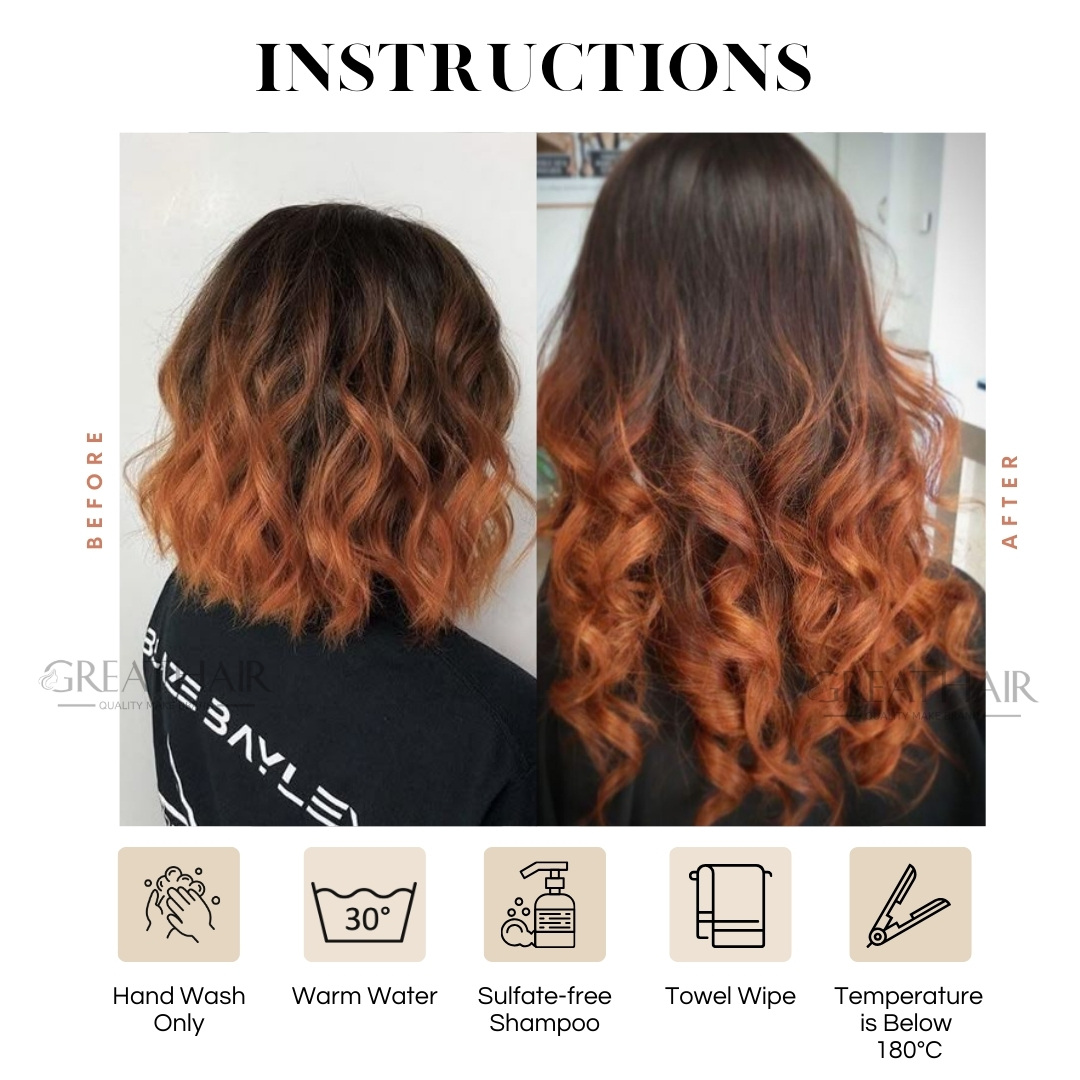
Maintenance is also relatively simple. With proper care such as gentle washing, sulfate-free shampoo, and moderate heat styling, the hair can maintain its wave pattern and shine for a long time.
Overall, the ombre brown orange color water wavy frontal offers a balance of beauty, versatility, and natural appearance.
Vietnamese hair is widely known for its strength, smoothness, and durability, which makes it a preferred material for high-quality hair extensions and frontals.
One key reason is the natural hair structure. Vietnamese hair strands tend to be thick and strong, which helps them hold wave patterns and color treatments well. This makes them particularly suitable for styles like the ombre brown orange water wavy frontal, where both texture and color play an important role.
Another advantage is cuticle alignment. High-quality Vietnamese hair is often collected and processed in a way that keeps the cuticles aligned in the same direction. This helps reduce tangling and keeps the hair looking smooth and manageable.
Vietnamese hair also has a natural shine and softness. Even after coloring into ombre shades such as brown and orange, the hair can maintain a healthy appearance when processed carefully.
In addition, Vietnamese hair is known for its long lifespan when properly cared for. With correct washing routines, gentle handling, and minimal excessive heat, the frontal can remain beautiful and wearable for extended periods.
Because of these qualities, Vietnamese hair is often considered a premium choice for creating stylish products like the ombre brown orange color water wavy frontal.
The ombre brown orange color water wavy frontal works well with many different hairstyles. Its natural waves and gradient color make it suitable for both everyday styles and more glamorous looks.
Loose Water Waves: This is the most natural way to wear the hair. Simply defining the existing waves with light styling products creates a soft, effortless look that highlights the ombre color transition.
Side-Part Waves: A side part adds volume and frames the face nicely. The brown roots blend naturally near the hairline, while the orange tones bring brightness toward the ends.
Half-Up Half-Down Style: This style shows off both the hairline created by the frontal and the length of the waves. It is a popular choice for casual outings or social events.
Defined Curl Style: Using a curling wand can create more structured curls from the existing water wave texture. This gives a fuller, more dramatic hairstyle that emphasizes the color blend.
Long Beach Waves: By slightly brushing out the curls, the hair can be styled into relaxed beach waves. This style highlights the movement of the hair and enhances the ombre effect.
Because of the flexible frontal construction, these styles can be achieved while maintaining a natural-looking hairline.
| Specification | Details |
|---|---|
| Product Name | Ombre Brown Orange Color Water Wavy Frontal |
| Material | Remy Human Hair |
| Texture | Water Wavy |
| Color | Ombre Brown to Orange |
| Length Range | 8 – 30 inches |
| Construction | Frontal |
| Hair Features | Thick ends, natural shine |
| Styling Ability | Can be dyed and styled |
| Heat Recommendation | Below 180°C |
| Washing Method | Hand wash with warm water and sulfate-free shampoo |
.
Water wavy hair has a loose, natural wave pattern that sits between straight and curly textures. It creates soft volume and movement without looking overly styled.
Yes. The hair can be styled with curling irons or straighteners, but it is recommended to keep the temperature below 180°C to maintain hair quality.
The frontal should be gently hand washed with warm water and sulfate-free shampoo. After washing, pat the hair with a towel and allow it to air dry.
With proper care and the use of color-safe products, the ombre brown and orange tones can remain vibrant for a long time.
The frontal can be used for wig making or sew-in installations. It allows for flexible parting and a natural-looking hairline.
If you want a hairstyle that combines dimension, texture, and natural movement, the ombre brown orange color water wavy frontal is a stylish and versatile option. Its soft waves and warm color gradient create a look that stands out while still maintaining a natural feel.
Contact GreatHair Today
Use sectioning clips to separate a thin horizontal layer of your natural hair at the nape of your neck. This will be the first section to which you’ll attach the wefts.
Thread the weaving needle with the weaving thread. The thread color should match your hair color for a natural blend.
Continue sewing along the weft, moving from one side to the other. Make sure the weft lies flat against your scalp. Be careful not to sew through your scalp or too tightly, as this can cause discomfort or damage.
When you reach the end of the weft, sew the thread through the weft a few times to secure it. Cut off any excess weft if necessary.
Release another section of your natural hair above the attached weft and secure it out of the way using hair clips or ties. Repeat steps 3 to 7 to attach more wefts, working your way upwards.
Weave-in extensions should be removed by a professional hairstylist to avoid damaging your natural hair. They will carefully cut the threads and gently remove the wefts.
Due to the intricacies involved in sewing in the wefts and the potential for damage if not done correctly, it’s recommended to consult with a professional hairstylist for the application and removal of weave-in hair extensions.
Following these guidelines will help you maintain your wig weft effectively, ensuring it stays in good condition and lasts longer.
For orders that require production, the average production time varies depending on the type and quantity of the items. On average, it takes around 7-10 days for production.
"I will ship to you by DHL/UPS/FedEx/EMS. Besides, If you have your shipping agency, I will ship to your agency, then they will ship to you)"
"After receiving your payment we will prepare the hair to ship. When it’s ready, I will ship it immediately and it can take 3 -5 days to ship. It takes about 2-4 days to ship to Euro, Russia, Australia, American and about 4-5 days ship to Africa."
Our double drawn range means thick and voluptuous hair from top to bottom. This is in contrast to the natural ends like our own hair has, which may be thinner towards the bottom.
Some shedding is normal within the first couple wears, just like your own hair! But if you feel your hair are shedding excessively, please feel free to contact us.
You will be emailed a shipment confirmation email along with a tracking number to track the shipment of your package. In some circumstances, this tracking number is not a step by step tracking rather a delivery confirmation.
The lifespan of Great Hair is anywhere from 6 - 12 months, depending on their usage and how they are cared for and maintained.
"""Our extensions consist entirely of 100% human hair that has undergone a unique dyeing process. While our products are designed to accommodate color application, we highly recommend seeking the advice of a skilled and experienced colorist. It's important to note that dyeing could potentially impact the longevity of your Great Hair extensions and could result in damage if not executed correctly. We also strongly advise against attempting any form of lightening or using bleaching agents. For our Balayage or Ombre sets, we must emphasize that dyeing is not recommended. These particular sets have undergone multiple processing stages, which makes them less suitable for dye application. Due to their extensive processing history, these sets do not respond well to dyeing attempts."""
The best way to wash your extensions is by gathering all the hair strands together into one ponytail. Then run the ponytail under lukewarm water. Squirt a nickel size worth of shampoo into your palm and lather into hair. If needed, rinse and repeat until the shampoo begins to lather. Next, apply conditioner combing it through the hair using a wide tooth comb to distribute the product evenly and rinse again. Finally, we recommend letting your extensions air dry by using a hanger. The picture below will show you what your hair extensions should look like after they dry. We recommend the Daily Duo-Pure Care Shampoo & Conditioner for Human Hair by BeautiMark, and Cleansing Duo-Shampoo and Conditioner for Synthetic Hair by BeautiMark.
We recommend washing your hair extensions every 6-8 wears using the appropriate product for synthetic or human hair. Extensions don’t accumulate oils the way our natural hair does so washing it more often than this can weather the fibers and damage your extensions.


Address: 8 Ngo 20/45 D. Phu Minh, Minh Khai, Bac Tu Liem, Ha Noi, Viet Nam
Phone: (+84)813282399

There are no products in the cart